
This guide will outline writing your first Node.js application. Node.js is a packaged version of the V8 Javascript engine, created by Google and shipped in Chromium. Although Node.js is cross-platform, specific tips for IBM i are given in section 8.
![]()
- Preface
- Installation
- Hello world
- Your first web application
- Debugging
- Building RESTful APIs
- Installing ODBC
- Connecting to IBM i
Preface
This is not a JavaScript tutorial. If you haven’t used JavaScript before, please read up on the following JavaScript references first:
Installation
You can install Node.js on your PC from the Node.js website. You can install it for the operating system you use. Node.js supports most popular operating systems: https://nodejs.org/en/download/

As well as Node.js, you need an IDE to write JavaScript code. The most popular choice for newcomers is Visual Studio Code (also known as ‘vscode’ or Code). Visual Studio Code is free, and provides useful tools and extensions for writing JavaScript. VS Code is created and maintained by Microsoft and is available for free: https://code.visualstudio.com/download

Hello world
You are going to use Visual Studio code to write your first ‘hello world’ script. Firstly, you should create a directory to place your first Node.js project.
Then, in Code, use Ctrl+O or File->Open and open the directory.

You will see that the directory is empty, so you will want to create your first Node.js script. Node.js has two common names for entry point files (the file that is run first in your app).
1. index.js – the most common
2. app.js
To create a file, hover your mouse in the Explorer window and you will see buttons show up to create a file. You should select the button to create a file. You should call it one of the common entry point names.

You can also press Ctrl+N to create a new blank file. Your first ‘hello world’ script is going to consist simply of one line:
//will print to the console
console.log(`Hello world!`)
Running your script from the command line
You are able to run your script from any command line. On Mac, the usual would be Terminal and on Windows it would be Command Prompt or Powershell.
When running from the command line, you will need to set your working directory to the directory you created which has your Node.js script in. You can do this using the cd command. You can then use the node command to execute your script. The second argument to the node command is the name of the script.
cd Documents/myapp
node index

Running from Code’s terminal
VS Code has an integrated Terminal window, which just hosts your systems terminal inside of it. When you launch the Terminal from Code, the default working directory will be the directory you have open in Code (so by this time it should be your project directory).
Code’s Terminal window usually lives towards the bottom of the application. You can press Ctrl+J to show and hide that window. That window has a tab called Terminal, which you should click when you see it.
From here, you can use the usual command line’s commands (like cd), but to run your Node.js script, you can use the node command. The second argument to the node command is the name of the script.

Running from Code’s debugger
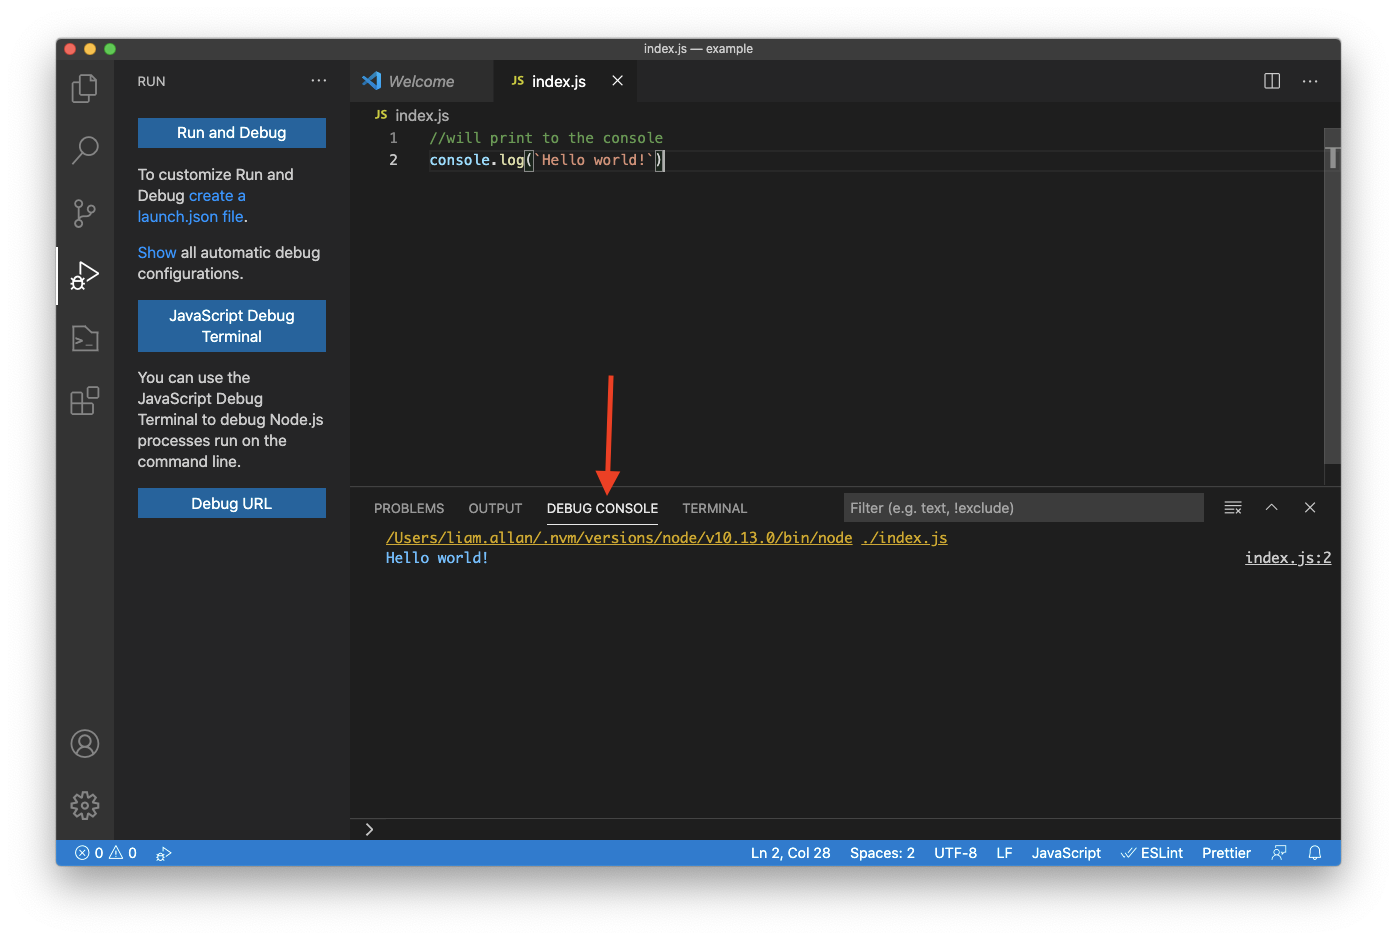
VS Code has an integrated debugger which will prove very useful in the future. It can also be be used to simply run our code.
Pressing Ctrl+J will show and hide a window at the bottom of the application. That window will have a ‘Debug Output’, which will have your debug output (like your console.log).
To run your script, make sure you have your script as the currently open tab, then just press F5. You may see a drop down menu appear at the top of VS Code which allows you to select your application’s runtime. You can select Node.js:

After selecting that, your application should run and you should see the console output in the Debug Output.
Note: Every time you hit F5 you will have to select your application runtime. To skip this, you can optionally create a launch.json, which will store your debug configuration. Then, when you start debugging it will just run your application instead.
Your first web application
Something Node.js is good at is writing web applications. While it is useful for serving web pages, it is especially useful for restful APIs.
Node.js has a built-in web server, meaning that while you don’t need to run Apache or nginx as web servers to access your app (like you would for PHP)—although it is common when running in production to use a front end web server on top of Node.js.
To make use of the Node.js web server, we use a module called express.js. express.js is a free and open-source framework that makes using the Node.js web APIs a ton easier by wrapping them in simpler functions we use.
To install express.js (‘express’ for short), we need to use the Node Package Manager (npm for short). npm is installed along with Node.js and is available to use on the command line (just like the node command).
To install express:
- Open your terminal (either from the command line or VS Code).
- Make sure your working directory is your project directory.
- First, we run
npm init, which creates a package.json file. You only need to do this if it’s a new project and thepackage.jsondoes not exist. This file is used to track information about your project, like the name, dependencies, among other things. - Use
npm install expressto fetch express into your application directory.
When you install modules from npm it:
- installs the module into the directory you’re working in (in the
node_modulesdirectory) - adds the module you’re installing to the
package.jsondependency list.
Now that you have express installed, you can use it in your app. Replace your existing script with the following code:
const express = require(`express`);
const PORT = 5000; //You can change this
var app = express();

app.get(`/`, (req, res) => {
  res.send(`Hello world!`);
});

app.listen(PORT, () => {
  console.log(`Listening on port ${PORT}.`);
});
To summarize, this will start a web server running on port 5000. The app is listening for requests on the root page (/) and will send Hello world! as the response.
You can start your app as you did earlier in the tutorial, either in the command line/Terminal or with the VS Code debugger.
- If you started the app in the command line or VS Code Terminal, you can use Ctrl+C to stop the app.
- If you start the app in the VS Code debugger, you can stop the app by pressing the red square in the debug box (usually at the top in VS Code) or by pressing Shift+F5.
When your app has started, you can go to http://localhost:PORT/ where PORT is the port number you defined in the script. You should be treated with ‘Hello world!’
Debugging
VS Code has a very good debugger built in. When you start your application using the built-in debugger you will see that the bar at the bottom will turn orange. That means your app is running and is ready to be debugged. As you already know, you will be able to see any standard out or error in the Debug Console.
To set a breakpoint, hover over the line number and you will see a light red circle show up to the left of the number:

If you click on the circle, it will make the circle become solid. This means a breakpoint has been set on this line. When your breakpoint has been hit, VS Code will appear and will highlight the line which is currently being debugged. From here, you can use the input box to evaluate expressions or continue to step through your script.
Like most debuggers you can:
- highlight over a variable to see the value
- use your function keys to set through (also using the debug box that appears when you are debugging)
- set conditional breakpoints (by right-clicking on the red circle where you set a breakpoint)
- end the debugging session
Building RESTful APIs
Testing web APIs is something that a web browser cannot do alone. For API testing, you should also install Postman. Postman is a free API client that allows you to create collections of APIs, setup variables between APIs and also run automated tests on them. You can download Postman here: https://www.postman.com/product/rest-client/
The HTTP protocol is a complicated mess. Using express really does make it easier for you. Express deals with routing, middleware, HTTP methods, headers, and much more.
In this example, we’ll be looking at creating two APIs, that both work with JSON.
- A GET API to return a list of items in a to-do list.
- A POST API request to add an item to that list.
Our to-do list will not come from a database. To make things simple for now, you will just define the list as a variable in your app that all your APIs can use.
First, let’s define the base of the application.
const express = require(`express`);

const PORT = 5000; //You can change this
var app = express();

//parse application/json bodies
app.use(express.json());

/** @type {string[]} */
var todoList = [];

//Routes go here.

app.listen(PORT, () => {
  console.log(`Listening on port ${PORT}.`);
});
The next step is to build two routes for your app.
GET route
A standard GET API is used to only return data, and that’s what we will do. Let’s create this route.
app.get(`/todos`, (req, res) => {
	res.json({
    todoList
  })
});
This GET API simply returns an object with one property called todoList, which is an array of strings.
POST route
A POST API is used to usually create data, which in the case of adding to our to-do list, is what we’re doing—creating a ‘todo item’.
To create a post route we use app.post. Each of the HTTP methods has their own express API (like app.get and app.post). In this case, we want to create a route using the POST method, so we use app.post.
Our API will require the user to pass a JSON body (application/json) to add items to the todo list. That JSON body will require an item property:
app.post(`/todos`, (req, res) => {
  //Expand the body to get the item out.
  const { item } = req.body;

  if (item) {
    todoList.push(item);

    //Send 200 status with JSON response
    res.json({message: `item added successfully.`});
  } else {
    //Send 403 status with JSON response
    res.status(403).json({message: `item property required`})
  }
});
Testing your APIs
This is where Postman is required. Web browsers can easily call GET APIs from any URL, but do not call any API using the POST method.
You may call your APIs in the following order to test them.
Get your todo list:
GET /todos

return
{
  todoList: []
}
Add to your todo list
POST /todos
{
  “item”: “Clean my office desk”
}

return
{
  “message”: “item added successfully”
}
Installing ODBC & Connecting to IBM i
This is mostly one process. There are two parts to use ODBC with Node.js:
- The node-odbc module. You install this on every Node.js project.
- The IBM i / Db2 driver on your operating system. You install this only once on your OS.
I wrote another guide on how to do this, which you can find here.
Developing with Node.js
Node.js has become a popular web and API developments tool both on IBM i and off. Experienced developers are able to build applications with Node quickly, including for mobile apps. If you would like us to build you a great application in Node.js using IBM i data, get in touch.