
How to Validate Self-Signed SSL / TLS Certificates from IBM i
(Co-authored by Gautier Dumas and Calvin Buckley)
 When we use open source languages such as PHP, Python, and Node.js on IBM i to help companies build and access APIs and other resources, we expect these resources to be protected with encryption (for example, the https:// protocol). Further protection is provided by an SSL / TLS certificate that can be authorized, or signed, by a popular certificate authority such as Verisign, Comodo, or Let’s Encrypt, or signed internally by the company itself.
Self-signed certificates are most useful in situations where public trust of a certificate is unnecessary, such as:
- Test server environments
- Internal company environments
It takes preparation to make sure internal applications will trust these self-signed certificates. Web browsers such as Firefox, tools such as curl, and languages such as PHP (5.6 and higher) will warn about, and sometimes block, access to secured resources that do not provide a trusted certificate.
Test #1: Untrusted Certificate
The following example demonstrates an attempt to access https://self-signed.badssl.com/, a site for testing certificate problems. Curl returns an error due to the self-signed certificate.
|
1 2 3 |
$ curl https://self-signed.badssl.com curl: (60) SSL certificate problem: self signed certificate More details here: https://curl.haxx.se/docs/sslcerts.html |
Although we could bypass curl’s certificate verification process by using the -k (or –insecure) option, we prefer to let validation occur, for better security. We need to install the self-signed certificate on our IBM i system so that tools such as curl, PHP (based on RPMs) and Node.js can recognize and trust it.
Install the Server Certificate to Indicate That It is Trusted
We will retrieve the server certificate and register it on the IBM i as a trusted certificate. You can then consume the resources protected by this certificate without errors or having to disable validation.
First, make sure that the Open Source environment on IBM i is set up.
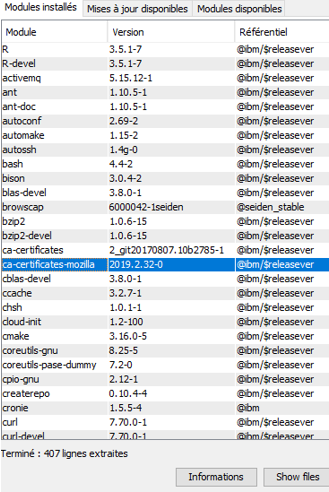
Then install the open source package ca-certificates-mozilla. This package installs the same trusted certificate store used by Mozilla Firefox, providing the well-known certificate authorities used by public web sites.
Install ca-certificates-mozilla
In ACS -> Open Source Modules Management, select ca-certificates-mozilla for installation from the list of available modules. After installation, check that it is in the list of installed modules:
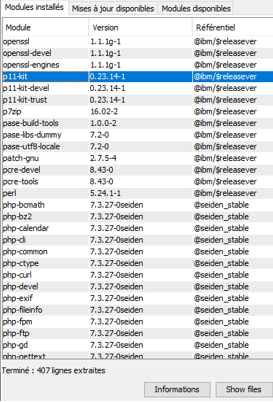
Install p11-kit
While ca-certficates-mozilla enables you to connect securely to sites with certificates signed by standard certificate authorities, it will not work for self-signed certificates. For this we will need the p11-kit package. Install p11-kit using ACS or this command:
|
1 |
yum install p11-kit |
Install openssl
While the OpenSSL libraries are almost certainly installed, the openssl command may not be. The openssl command can do almost anything when it comes to handling certificates. Install it with ACS or this command:
|
1 |
yum install openssl |

Get the certificate
Now you have to retrieve the self-signed server certificate in .cer format.
You can run the following command from a PASE shell with the path set to get the certificate and place it into the IFS, substituting your own values for the server, port, and file:
|
1 |
openssl s_client -showcerts -servername <server> -connect <server>:443 </dev/null | openssl x509 -outform DER > file.cer |
The breakdown of this command is:
- “s_client -showcerts” indicates we want to get a certificate from a remote system.
- “-servername ” specifies what certificate to get. This is the domain name or virtual host name.
- “-connect <server>:443″ tells OpenSSL where to get the certificate. If you want to access another service or port, simply change 443 to whatever port you need.
- “</dev/null” tells OpenSSL to not send anything to the server, by redirecting the input to the null device.
- This part of the command can be used to show information about the certificate. In fact, the certificate is even printed out as Base64/PEM. However, we want to do further processing on it, so we pipe it into another OpenSSL command.
- The “x509 -outform DER” tells OpenSSL to convert the certificate to the binary .cer format.
- Finally, we redirect the output of the binary certificate to the file we want.
Install the certificate
Next, we’ll add the certificate to the list of trusted certificates. The easiest way to do this is use the “trust anchor” command like so:
|
1 |
trust anchor file.cer |
You can run the following command to verify that you see your certificate in the list of trusted certificates:
|
1 |
trust list --filter=ca-anchors --purpose server-auth | grep -B3 -A3 <server> |
If you don’t see your certificate there, it may be because it wasn’t marked as a certificate authority. In that case, you may need to change how the anchor is categorized. Look in the directory /QOpenSys/etc/pki/trust for the file matching your certificate. Edit that file, changing the value on the “certificate-category” line from “other” (or whatever it now is) to “authority.” When you re-run the “trust list” command, you should see your certificate marked as an authority.
Update list of trusted certificates
Now, update the list of trusted certificates using the following command (in an SSH session for example):
|
1 |
update-ca-certificates |
This command will register as trusted certificates all certificates deposited in the / QOpenSys / etc / pki / trust / anchors folder as well as anything enrolled by “trust anchor.”
If you want to no longer trust a server, delete its file in the trust or anchors directory and then re-run the command:
|
1 |
update-ca-certificates |
Test #2: Trusted Certificate
When we re-run our curl test, we receive the web page successfully, without any warnings or errors. Congratulations!
|
1 2 3 4 5 |
$ curl https://self-signed.badssl.com <!DOCTYPE html> <html> <head> ..... |
Now you know how to access sites and APIs that use self-signed certificates in a secure manner. We demonstrated with curl, but your applications written in PHP (based on RPMs, because they utilize openssl), Python, Node.js, and other open source tools will automatically see your trusted certificates as well.
This article was adapted from https://cfd-innovation.fr/blog/consommer-une-ressource-utilisant-un-certificat-ssl-tls-auto-signe/ by Gautier Dumas. Thanks to Kevin Adler for generously sharing his knowledge of openssl with us.
If you have questions related to this article, or would like assistance with application security, development, or open source, please get in touch.
Thank you for this one !
Hope someone like you will write a working tuto (found none which really helped) for Let’sEncrypt certificates install.
Hope this helps: by Jesse Gorzinski
Command-line tools for working with Digital Certificate Manager (DCM) on IBM i.
Can be used in conjunction with CertBot to automate the acquisition/assignment/renewal of LetsEncrypt certificates
Thanks Alan,
This is a much better solution than setting a cafile for every cURL request and works with LDAP which could not be done with ldap_set_opt() or setting environment variables on IBMi.
Much appreciated!
Thanks, Jasper! Good to know this solution helped with LDAP as well as typical HTTP.
Thank you for this article. I was struggling to get our internal chain working with CURL, this was the solution.
Brice, glad the article helped you validate your internal self-signed certificate! It’s great to get feedback like this.